My Mosaic Wall – My Sugar Glider

A lot of people still don’t know what a Sugar Glider is, which is probably a good thing. They’re adorable, snuggly, loyal, and more work than someone would expect for a tiny marsupial that weighs less five ounces. A lot of people buy them on impulse, like Ivy and I did, and then realize they’re not just an expensive, smart, hamster-sized creature that is content to live alone in a cage and chew things. A lot of them end of being neglected or rehomed. Ivy and I had one for eight years until she passed away. Mia, as we named her, had a lot of adventures with us. She was on Pets 101 on the Animal Planet with us, played escape artist and got lost several times in our old place, and spent about six hours a day on average sleeping in my shirt and sharing my lunch when I worked from home.

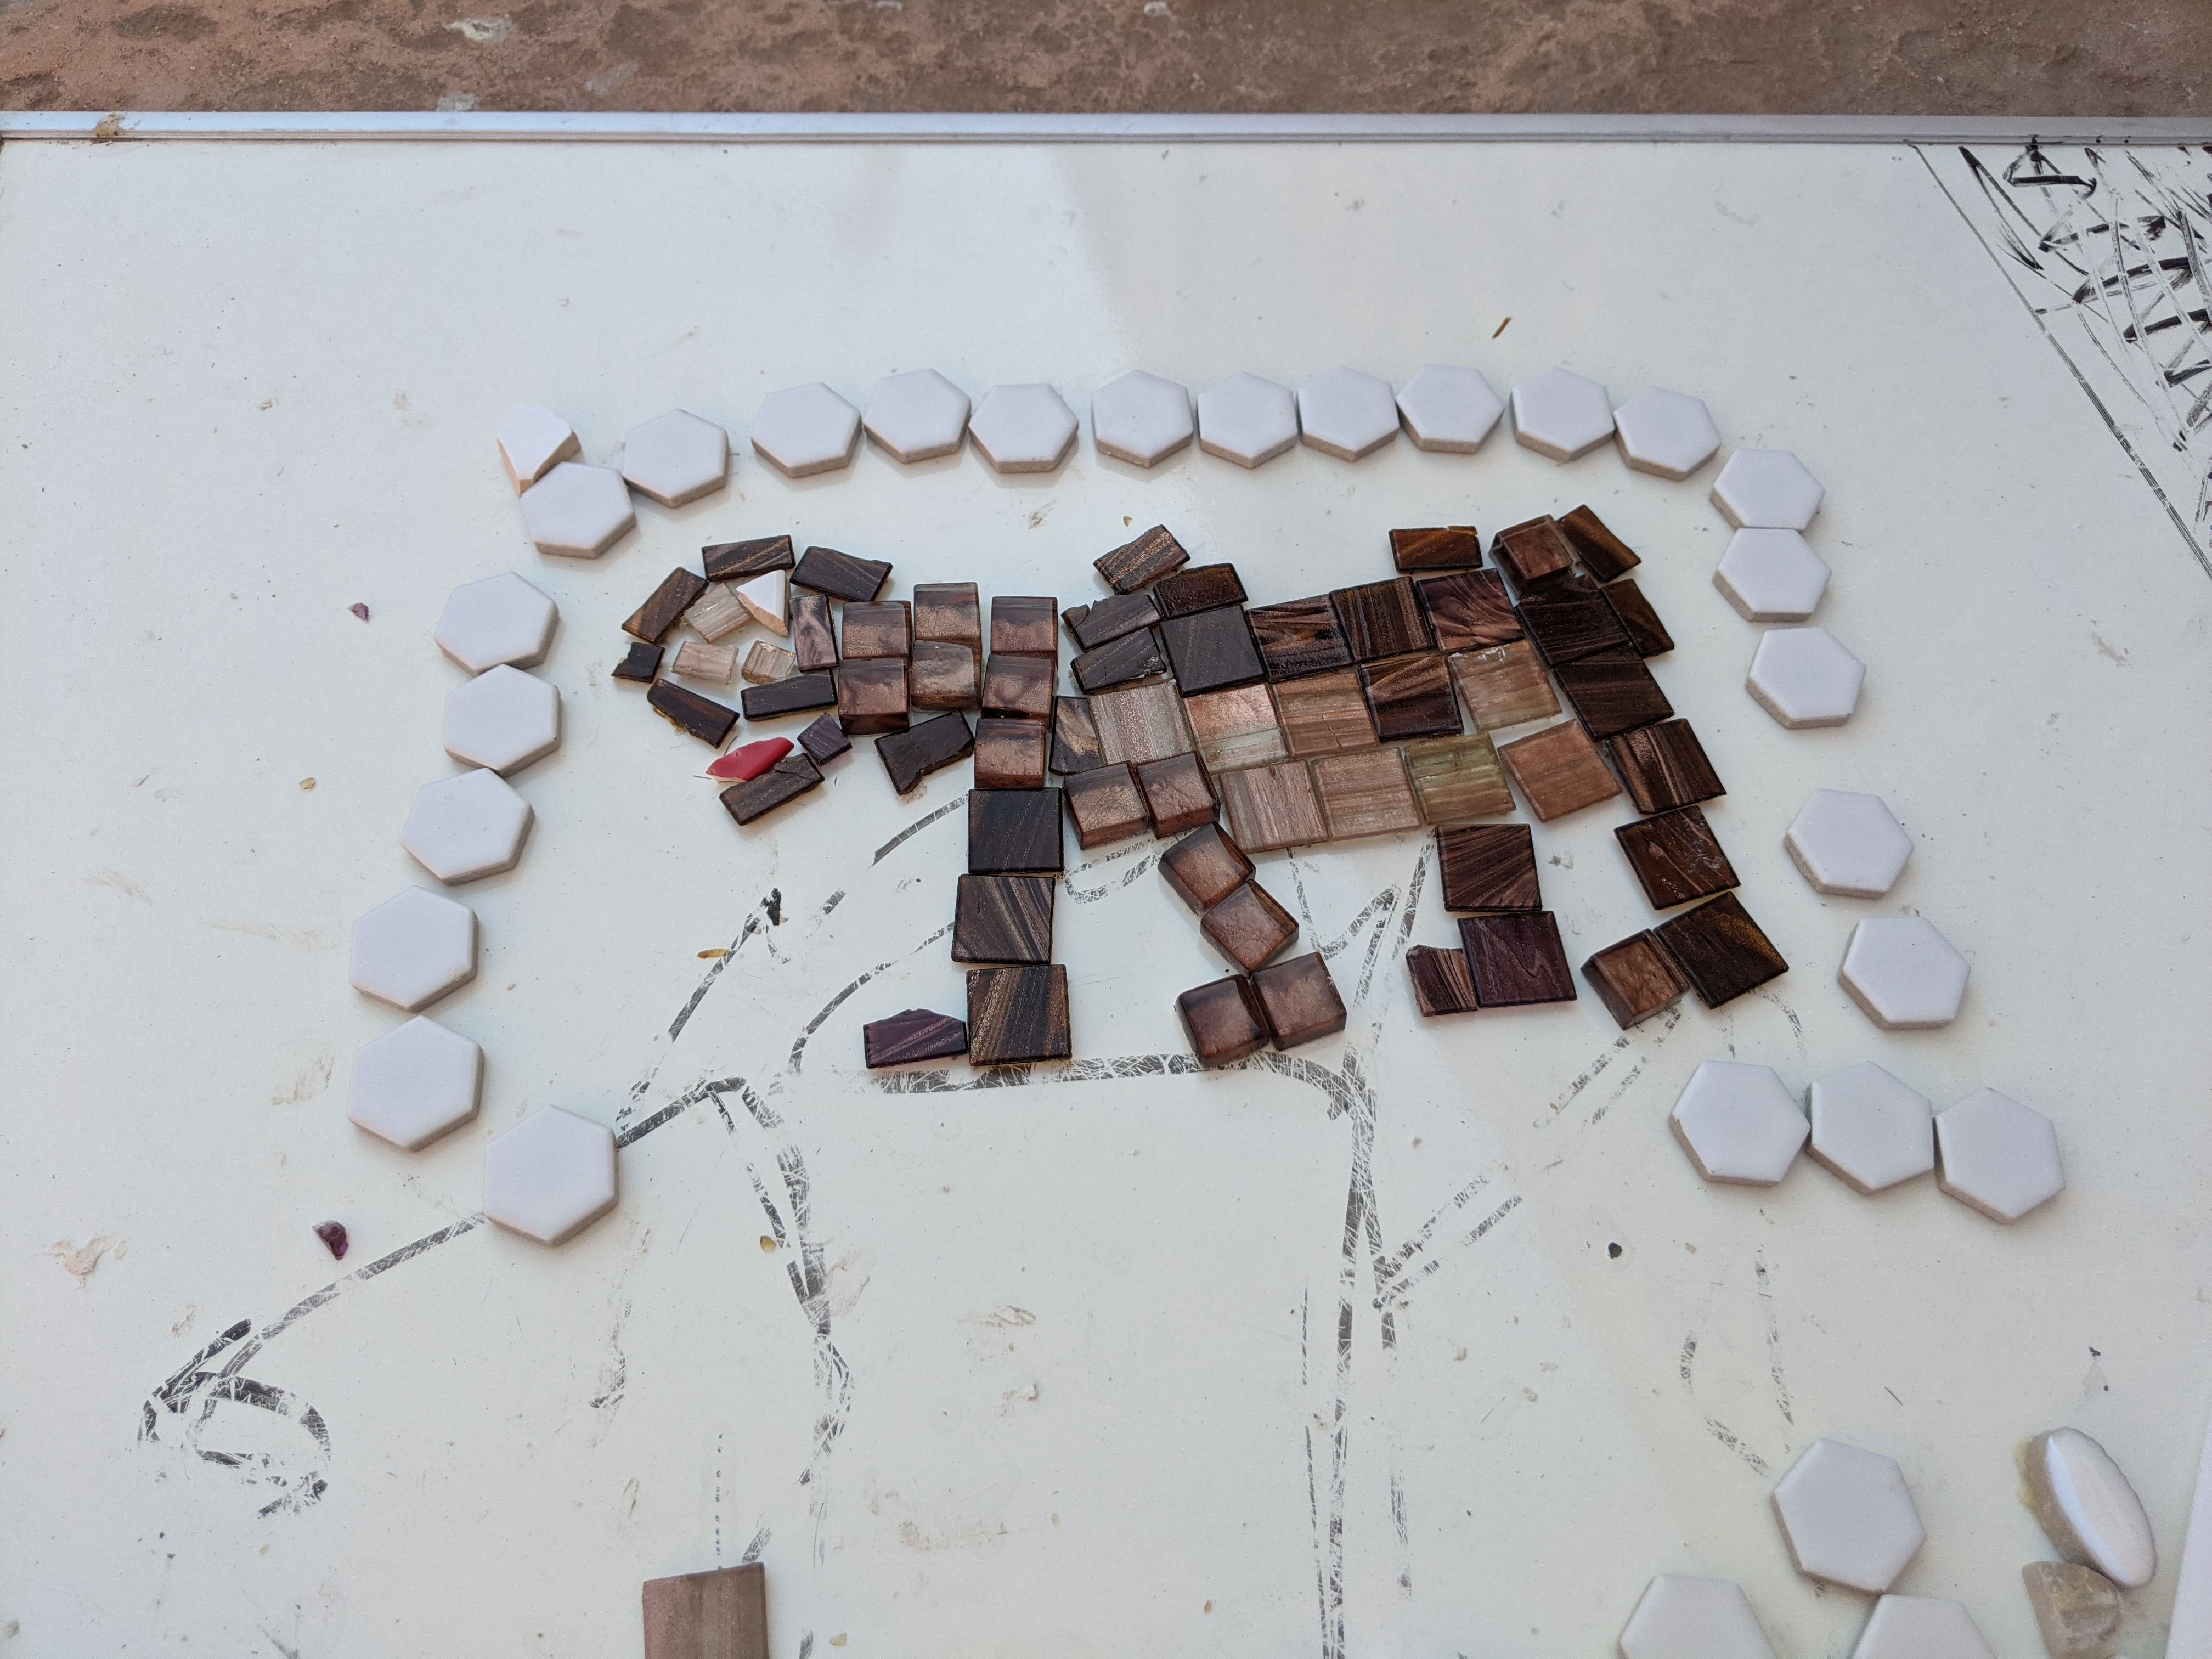
A few weeks ago I thought it would be fun to add a sloth to a bare spot I had on the wall. I looked at cartoon pics of a sloth and laid out a draft of it on a 12 inch square tile. I was pretty excited at how cute it was and expected this to be an easy project. I used bathroom white tile from the Habitat for Humanity Restore, gray floor tile from the same store, and various pieces of brown glass tile and black penny tiles from Home Depot. I’ve got some Dollar Tree broken plates for the leaves.

Unfortunately once I added it to the wall it looked terrible. But I wasn’t worried because once I add the grout everything usually falls into place. Except because there was so much white, it didn’t look at all like a sloth.

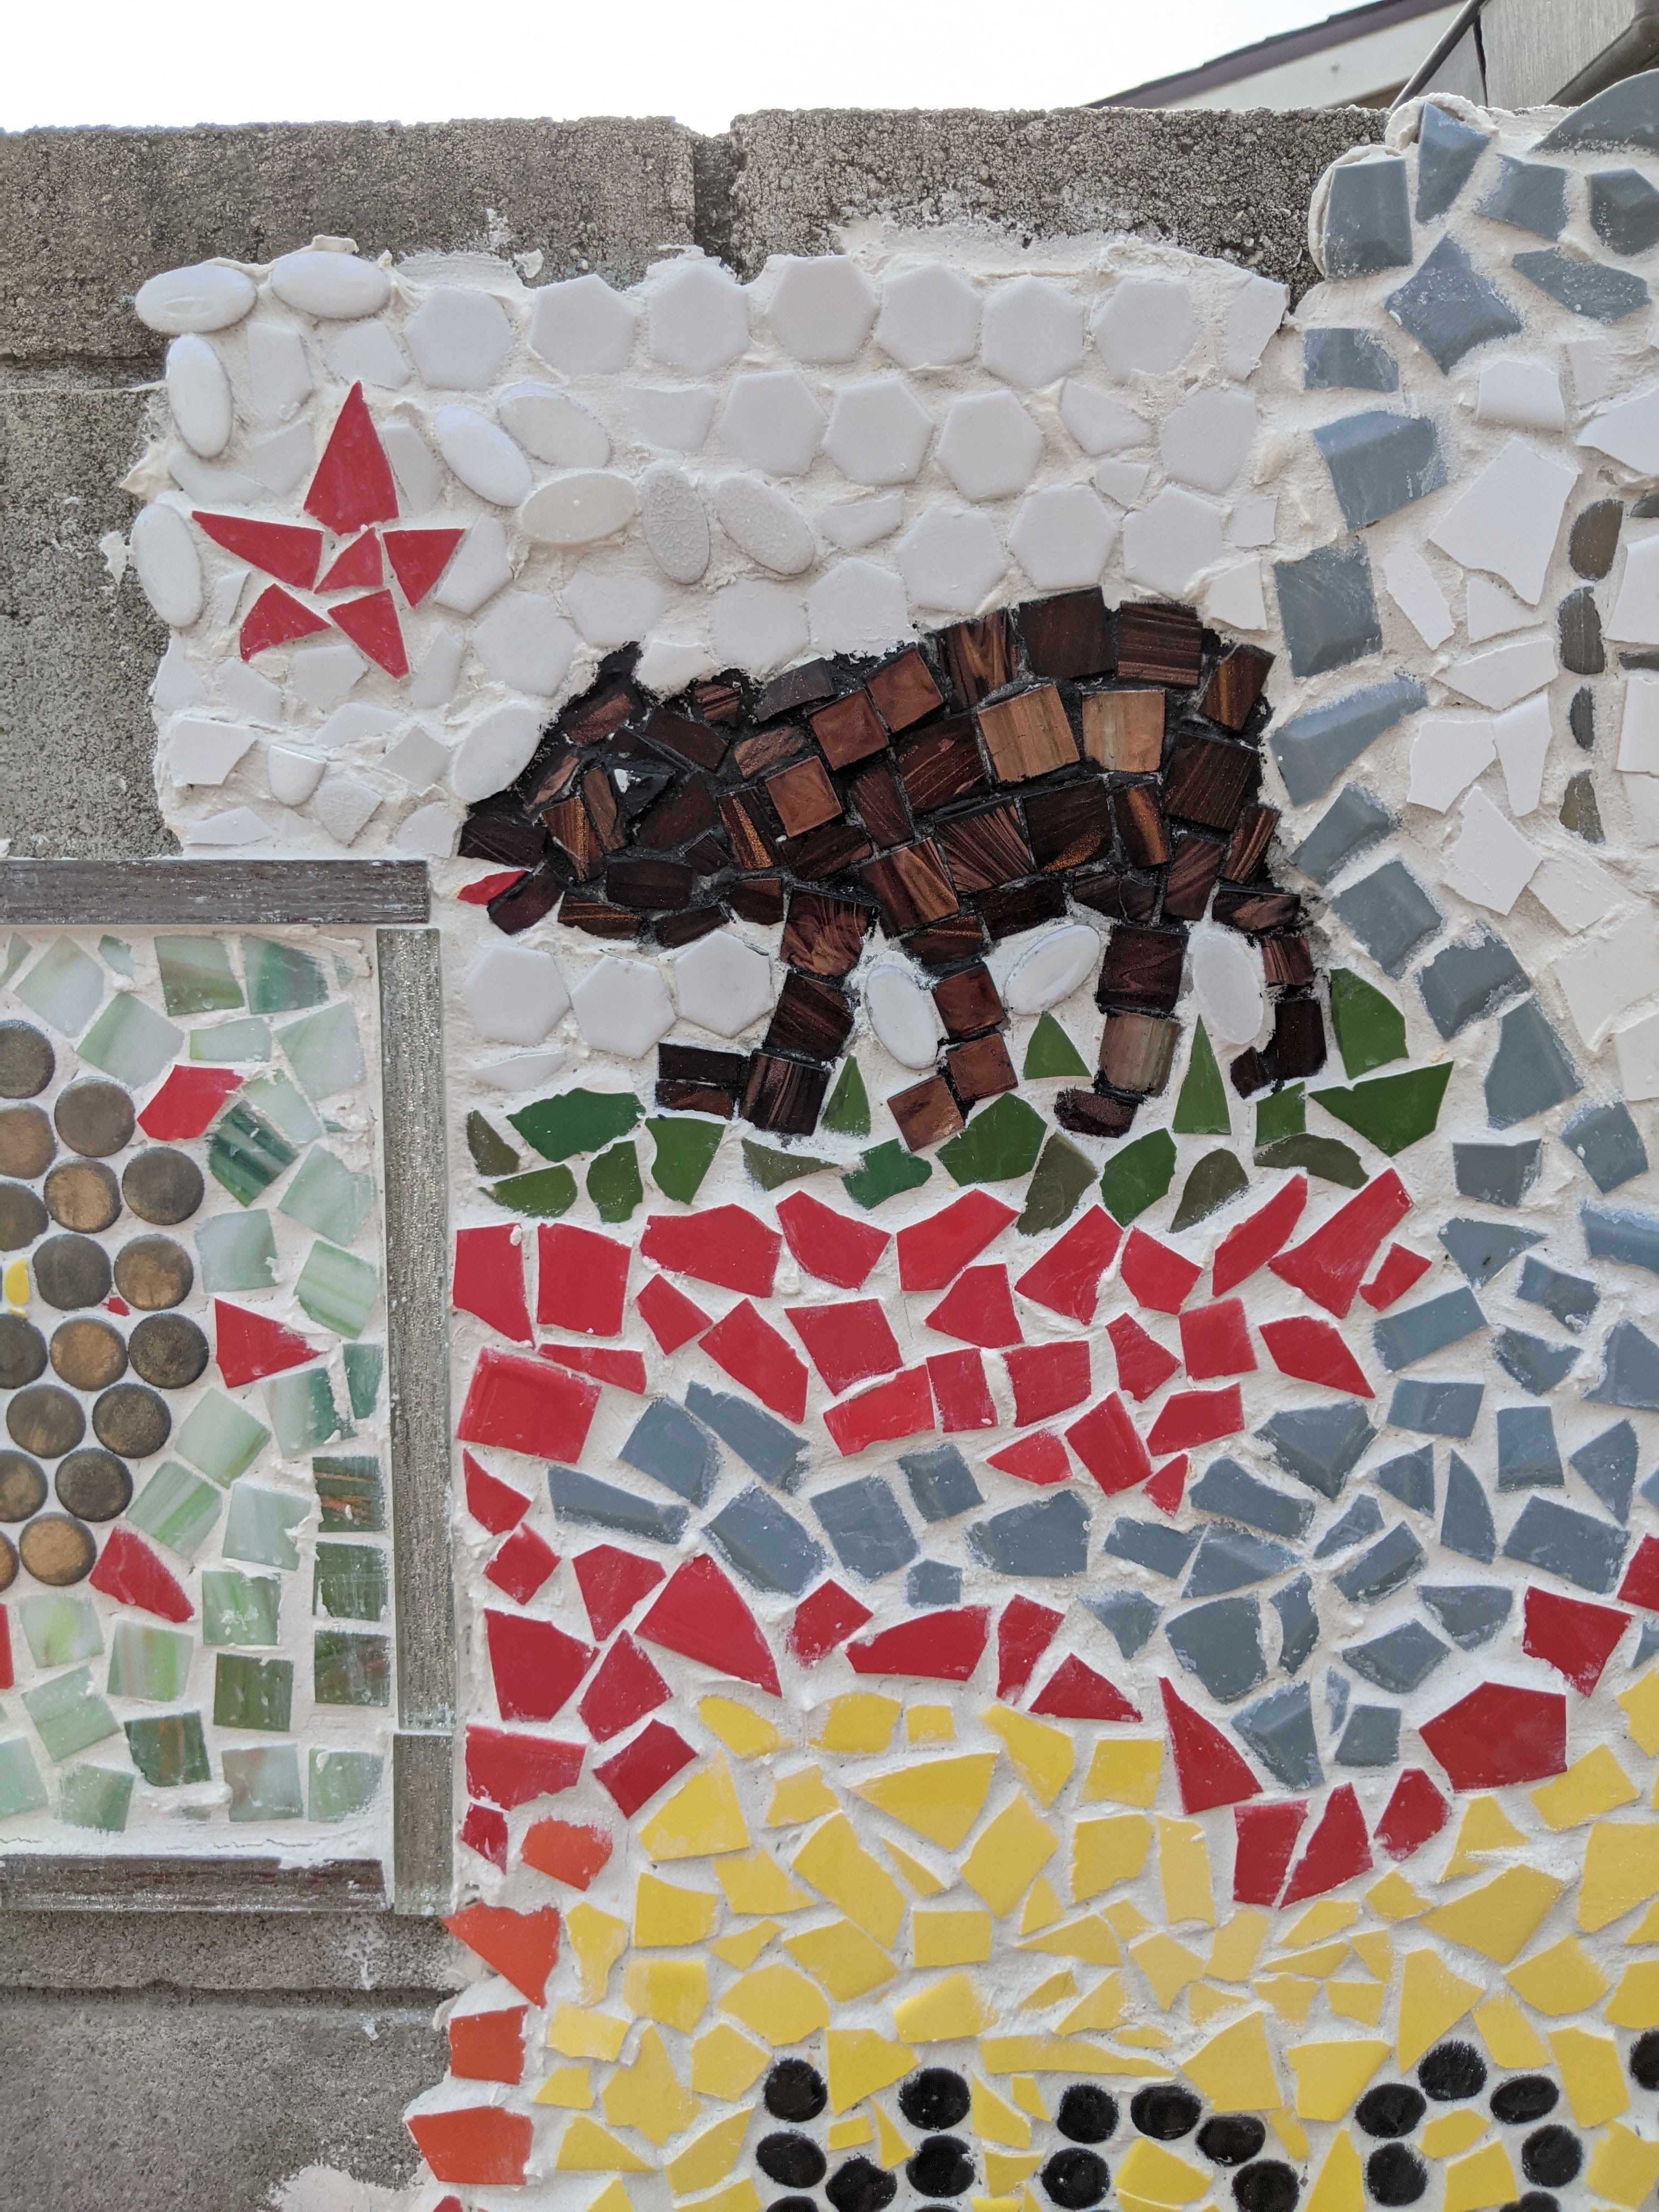
So I painted the in between spots with black grout paint. It looked ridiculous. And worse, I discovered sloths didn’t have tails so I had to chip away the tail, much to the annoyance of the husky next door who DID NOT LIKE all that hammering and chiseling. This was the final, which I hated. I planned to go out the next day and chip the whole thing off the wall which I have never done before but I was not pleased with it, at all.

When I looked at it closely, I saw that it kind of reminded me of Mia, my old Sugar Glider. She was gray and hung upside down from things and resembled this bad attempt at a sloth. She passed away a few years ago and I had failed to memorialize her on the wall previously.

I picked up medium gray grout stain and mixed it with my grout. I chiseled away the nose and the sky where the big ears would need to go. I didn’t want to chip away the sky where the sloth tail had once been, and add the tail back. But Sugar Gliders have long tails. I placed the tail tile over the sky tile, to go give it a 3D look but more so because I didn’t want to start chipping away too much of the long-settled piece beside it.

Finally, my finished result! Still not great but a lot cuter than it was before and now I’ve got my little Mia to make me smile when I look at the wall.

Now that I’ve got the gray stain I may go back and work on the Easter Island heads again. If I do, I’ll add an update to the last entry.

Two weeks ago I started an oil painting class so I may be adding pictures of new art one of these days.

Until then, happy creatiing!

Tracy

My Mosaic Wall – The California Flag

I’m at a crossroads with my wall. The area I can see from my patio is full. I now have to stand to my left to see all of it where the corner of the house is. To the left of the wall is a tree I don’t want to tile behind. I could tile up the wall on the hill, or against the back wall but I’m worried about water from when I water the plants. At this point I think I’ve decided I’ll continue the wall even if it’s beside the house and I can’t get a picture of it all at once. That’s what video is for.

For today though, I’m posting about my take on the California flag with its symbolic bear. One thing I learned pretty quickly into this project is that drawing bears is hard. Here are the first few steps I took. As you can see I wasn’t off to a promising start.

With determination, this finally all came together. All told it took about two hours the first day, and about fifteen minutes the next day for the grouting. First picture is the end of day one with no grout. When the project was done, I used black grout paint to make the bear’s white of his eye smaller. I sprayed the whole thing with grout sealer the third day and hoped the paint would withstand the heavy rain (and even hail that looked like snow on the other side of town). It worked out fine. I used a variety of tiles this time, from Dollar Tree broken plates to donated tile from friends, Home Depot, Lowe’s, and Habitat for Humanity markdowns.

Final pictures are of my trusty tile companion Granola. This was from another project but she’s always by my side and deserves a shout out.

Thanks for visiting!

-Tracy

My Mosaic Wall – The Giant Giraffe

I’m always looking for new things to add to the wall. I was watching The Last Tango in Halifax, the most recent season, and in one of the episodes someone painted a giraffe on the wall of a barn. So I figured why not put a giraffe on my wall.

I had a rough idea of what giraffes looked like, bright orange with brown spots. But when I looked at pictures online many of them were tan with brown spots. Since my art isn’t meant to match reality 100% I decided to do what i could with the tile and broken dishes I had on hand.

My daughter reminded me that giraffes have purple tongues (to prevent sunburn). Though I made the tongue light purple, it was hard to see until I grouted and added some black grout paint.

I left the sky around the trees bare for now. I want to make a spectacular sunset and maybe a word from tiles, like love or hope. In the close up picture it’s a little easier to see her purple tongue. She loves eating the leaves.

This was made from lots of broken tile, broken Dollar Tree plates, and by her feet a bag of tile stones I got from the Habitat for Humanity Re-store. The tree branches are pieces of floor tile that looks like wood. I generally don’t use this because it’s porous but it was just right for this and I’ve learned more about wiping grout off immediately that when I started.

The very hot, then very windy, then chilly weather kept me from my wall for a bit but I’m back on track. Look for more tile scenes soon.

Happy Creativity!

Tracy

My Mosaic Wall – The Dolphin

Once I made my first item on the wall, and learned a lot of what not to do, I was prepared to do something bigger and better. I decided to make a dolphin. It’s worth noting that except for being able to envision and describe things, I’ve always conceded that I don’t have much artistic ability. More and more though, as I complete this wall and look at some of the crafts and handiwork in my house, I’m thinking maybe I was too hard on myself. I’ve judged my work against artists who can draw something exactly as it looks. But haven’t just as many, or more, artists whose interpretations of what they see filled galleries with their work? My creations are certainly not gallery worthy, or anything I’d sell (except apple butter at fundraisers) but I need to stop thinking of my work as “something a kindergartner would do.” Which is how I usually describe my wall. As you’ll see in future posts, much of it has become a snapshot of people and pets and occasions in my life, right now. It’s a giant tile time capsule. It’s a way of expressing myself and capturing everything around me. It’s art for art’s sake, the best kind.dolphinstart

Since dolphins are complex,  I knew I needed to lay this one out on a whiteboard I used previously for brainstorming stories and books. It was collecting dust in the shed so I resurrected it and now it’s my go to layout board.  I recall using the tile cutting machine I bought when we did the kitchen, and painstakingly making a black circle for the eye, and carefully cutting the pieces of gray marble. Since then I discovered I can buy penny tiles from Home Depot online, and they’re already perfect circles. They’re the size of pennies and come in a sheet. The trend for home decorating now is white and tan and gray so it’s hard to find any fun colored tiles in the stores. I starting checking eBay and Home Depot for colored tiles.  I’ve gotten some for very little cost this way. I also check the Home Depot and Lowes stores for sale tile sheets.

Initially I bought mosaic tile from Amazon but when I got it, it was a box of tiny, thin pieces, shown above for the water and sun. I didn’t use it on the actual wall for the sun and didn’t have any other yellow then. There’s nothing wrong with thin tiles but when you have different height in the tiles, you can lose them when you’re grouting unless you remember to dig away the grout.

dolphin1

This is the completed dolphin before I added any grout. I was pretty excited about it, mainly because it looked so much better than the trees.

Next I added in some water. The blue glass was from a man on eBay who I drove an hour to meet rather than wait for it to come in the mail.  The only problem with it is that it’s glass and not ceramic tile, so if I smash it with a hammer it shatters and the shards fly into my legs (I’m usually in shorts and barefoot). Generally I try to fit it and otherwise use different tile when I’m trying to get into small spots. You can see some medium blue triangles. Those were the small ones from Amazon I mentioned. This is how I learned not to use them with the thicker tile. The black tile is from the Habitat from Humanity store.

dolphin2

The next day I grouted. After this follows a later picture when I added a couple of palm trees and a sun. Those we done later but I don’t have a picture of the dolphin and trees only. Looking below I went back and added some other tile to the tree to get it to look better.

dolphingrout

dolphin3

Here’s a picture of my go to materials, which I’ll add every time. I also use this adhesive and this grout. You can use something else but I prefer this texture. It’s easy to work with especially on a vertical surface. Since I like to immerse myself in the process I used to do this barefoot, and I never wear gloves because they tear on the broken tile anyway.  Eventually I had to start wearing shoes because too many times I got tiny bits of glass or tile in my feet and couldn’t get them out. I still do it all bare handed though and cut my fingers pretty regularly. Not bad cuts though, no sutures yet. The first couple of times I used a putty knife to spread the grout but because of the uneven surfaces it didn’t work well.

IMG_20200616_120114

Since I’m writing these posts retroactively, here’s what the wall looks like today.

july 27

Until next time, thanks for reading.